What Is a Bombardier in Arc Raiders?
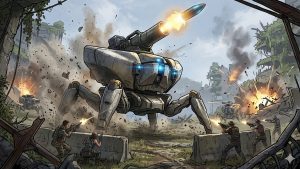
Man, the first time I spotted a Bombardier lumbering into view in Arc Raiders, my heart skipped. That thing’s like a spider-tank hybrid straight out of a nightmare, lobbing mortars that turn cover into confetti. You’re out there scavenging, minding your business, and boom – shells raining down. But here’s the good news: once you crack the code on these beasts, they become your personal ATM for Bombardier Cells. Those shiny cores? Game-changer for upgrading your Refiner. And yeah, we’re talking reliable spawns, foolproof kills, fat loot, and farming loops that’ll have you stacked in no time.
I’ve wiped the floor with dozens of them across Buried City runs and Blue Gate grinds. Solo? Duo? Doesn’t matter – with the right setup, you walk away laughing. Stick around, and you’ll never fear those artillery barrages again.
ChiefGames breaks it down, step by step – no fluff, just straight fire. And honestly, if you’re still getting one-shotted by these guys mid-game, this guide’s gonna fix that real quick. We’ve all been there, rage-quitting after a bad spawn.
Hunting the Bombardier in Arc Raiders – Prime Spawn Hotspots
Spotting a Bombardier isn’t luck; it’s knowing the map like your ex’s bad habits. These critters love open areas with sightlines for their mortars, often backed by those annoying Spotter drones. They pop up predictably on key maps, especially during Night Raids or Data Breaches for extra spice.
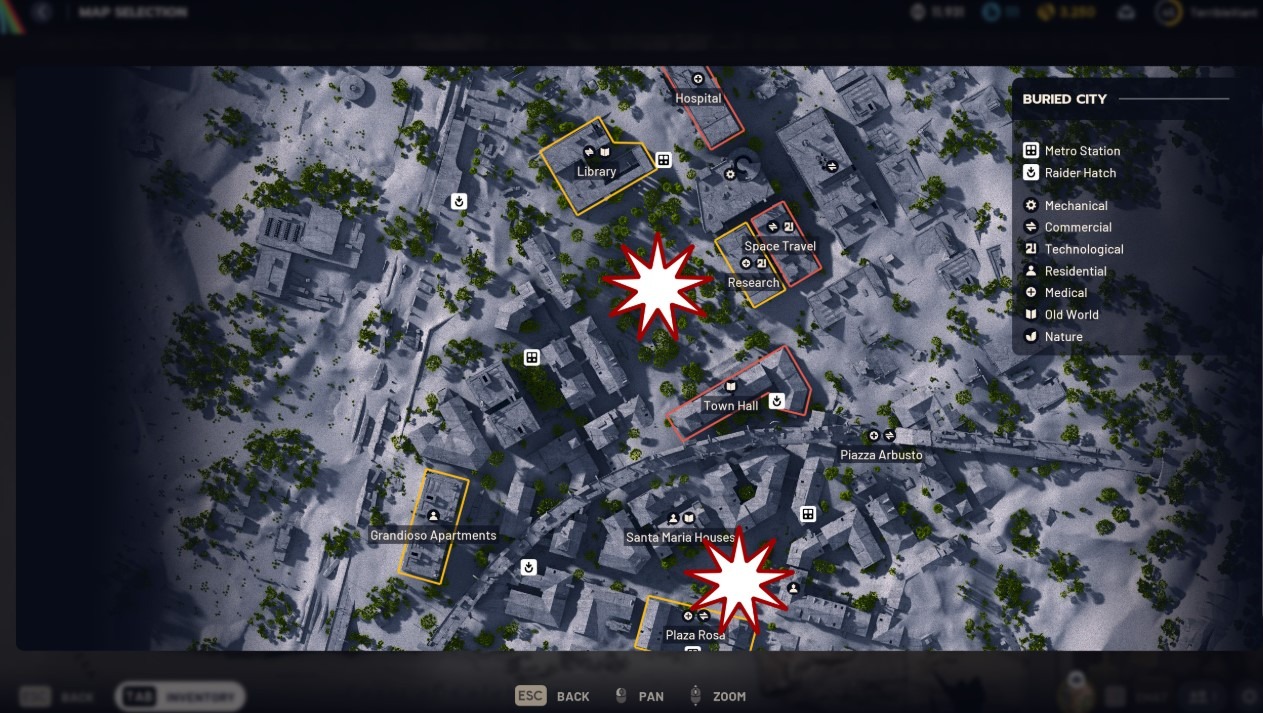
Buried City is the king for consistency – think rubble-strewn streets perfect for ducking shells. Blue Gate’s got that industrial vibe with tunnels for ambushes. Spaceport and Dam Battlegrounds fill in the gaps.
Pro tip: Check crashed ARC supply ships; sometimes they drop one right there. You know what makes it even better? These spawns scale with raid difficulty – Breach events crank up the odds, turning a solo grind into a cell bonanza.
| Map | Key Spawn Locations | Notes |
|---|---|---|
| Buried City | Outside Hospital; Top of Parking Garage (Piazza Rosa); Between Library & Town Hall; Marano Park; Santa Maria Houses | Most reliable – hit Night Raid for doubles. |
| The Blue Gate | Trapper’s Glade; Checkpoint Ruins (Raider’s Refuge); Traffic Tunnel | Tunnels let you flank easy. |
| Spaceport | East of Vehicle Maintenance; Near West Elevator; Outside Shipping Warehouse | Open spaces, watch for PvP. |
| Dam Battlegrounds | North of Hydroponic Dome Complex; Primary Facility (Night Raid) | Fewer players, higher risk from adds. |
| Others | The Trench; Marano Park clearings | Rare, but juicy if you roam. |
See those spots? Buried City’s Parking Garage rooftop is my go-to. I once chained three spawns in one hour there – pure adrenaline. But let’s get deeper; timing matters. Early raid? Head to the hospital exterior. Late game? Swing by Marano Park – the open fields give it room to stomp, but you’ve got buildings for cover hops.
Best Spots to Find Bombardier in Arc Raiders
If you’re grinding cells, prioritize Buried City’s Parking Garage rooftop. Climb the apartments in Piazza Rosa – you’ve got overhead cover, multiple exits, and a straight shot at its back. Spotters buzz in, but pop ’em quick. Santa Maria Houses looking south? Classic camp spot; seeker nades clear spotters while your Anvil chews legs.
In Blue Gate, Trapper’s Glade, during breaches, the terrain funnels it right to you. Spaceport’s West Elevator? High ground from the 5th floor; snipe, loot, dip. You know what? These spots aren’t random; ARCs’ path is predictable. Listen for the stomp – that’s your cue. And if you’re duo queuing, split up: one scouts Hospital, the other loops Town Hall. Double the spawns, double the cells.
Don’t sleep on Dam Battlegrounds either. North of the Hydroponic Dome? It’s quieter, fewer randos stealing your kill. Night Raid there, and you might pull two Bombardiers with minimal adds. Pro move: Use the drone scanner augment to ping ’em from afar – saves you wandering into a hornet nest.
Taking Down the Bombardier – Strategies That Actually Work
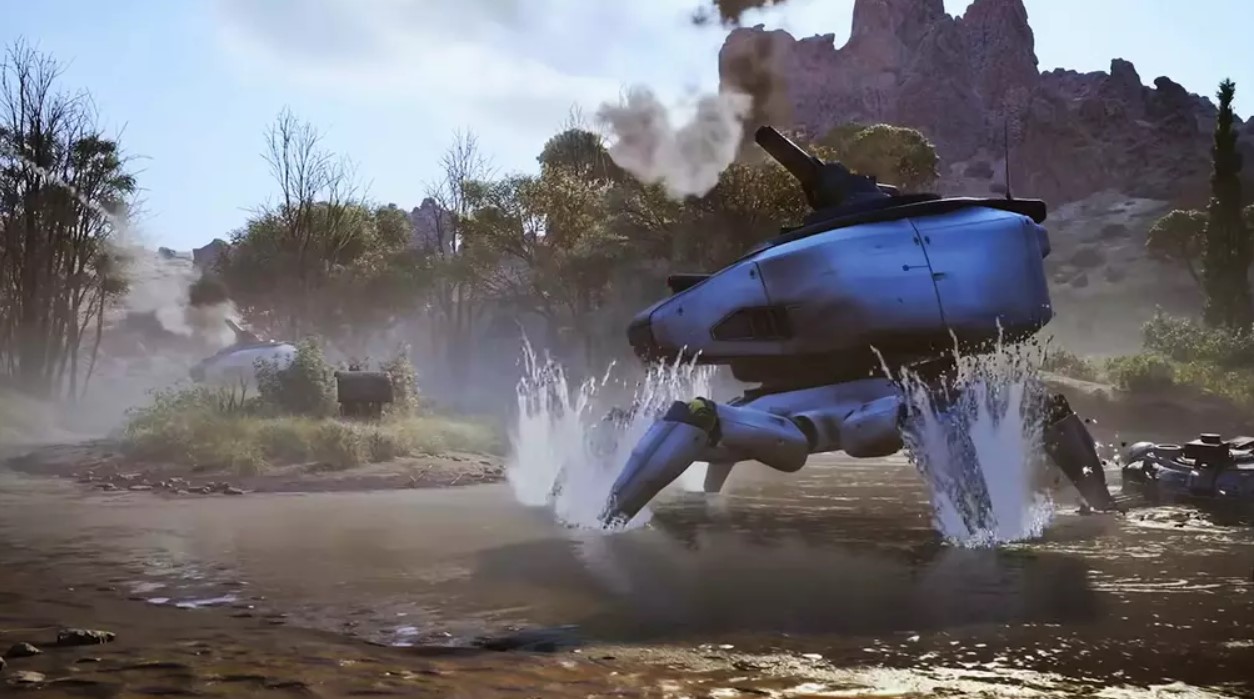
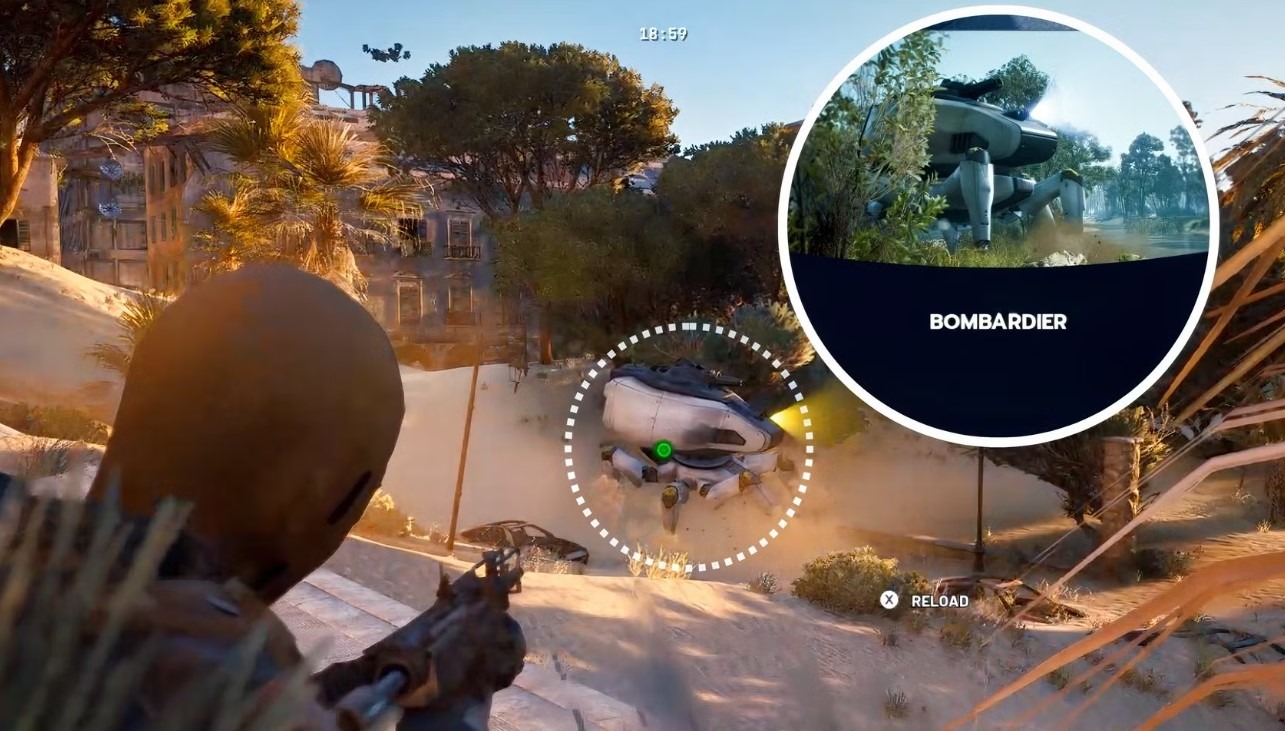
Alright, you’ve found one. Now don’t be that guy who eats three mortars and revives his squad into oblivion. Bombardiers pack 2,670 HP, light armor up front, but they’re slow and predictable. Their game is lobbing explosive shells guided by two Spotter drones – kill those flyers first, or you’re a sitting duck. They respawn, so loop it.
Vulnerable right after a mortar volley; that’s your window. And oh, the weak points – yellow gold. Here’s the hit list:
- Rear yellow cylinder/canister: Blow this, expose the core/barrel for massive damage. One Deadline mine here? GG.
- Leg joints/kneecaps (all four legs): Cripple mobility, stun it, open unarmored bits.
- Exposed core post-canister: Pour fire.
Explosives melt ’em – 2-3 Wolfpacks direct-hit the dome, then swap to guns. No explosives? Hullcracker spam from cover.
Cover is king: Ceilings block shells, few windows. Roll sideways; they predict straight lines. Medium/Heavy Shield buys you hits – light? You’re toast in two. The thing is, sound cues are huge. That whir before a shell? Roll now. I’ve dodged barrages by pure audio alone.
Look at the fight flow: Spotters hover high, so verticality wins. Jump pads or snap hooks get you eye-level for Arpeggio bursts. Once they’re dust, the Bombardier blind-fires – kite circles, pepper knees.
Solo Strategies for Bombardier in Arc Raiders
Soloing shooters like this feels epic, but pack smart. Lure grenade distracts, Trailblazers or Wolfpacks soften, Deadline seals. From Buried City apartments: Toss explosives over the garage edge, duck, repeat. Anvil IV with heavy ammo stacks – 160 rounds focused on knees.
Spaceport 5th floor: Snipe spotters, unload Hullcracker, zipline to loot. Hornet Drivers stun if you’re in low gear. Looting MK.2 Augment mandatory – grabs all 6 cells without dropping. I solo-farmed 12 cells in 45 minutes once. Honest.
Duo? One spot/grenade, other flanks back. Sync Wolfpacks – overkill fun. But solo shines for low-pop servers. Gear check: Refiner II minimum for Hullcracker ammo. Early game? Stick to Ferro and Triggers – still doable in 4 minutes.
| Loadout Category | Must-Haves | Why It Slaps |
|---|---|---|
| Shield | Heavy Shield w/ Tactical MK.2 | Tanks 4 hits, smokes on break. |
| Primary | Hullcracker (Launcher Ammo) | Top ARC pen, explosive rounds. |
| Secondary | Anvil/Ferro (Heavy Ammo) | Budget kings, knee-melters. |
| Grenades | 4x Wolfpack, 6x Trigger/Blaze | Chunk 50% HP easy. |
| Healing | 10 Rechargers, 10 Bandages, 2 Defibs | Sustain the barrage. |
| Utility | Snap Hook, 2 Safe Pockets Aug | Climb/loot/escape. |
Craft at Gear Bench II+:
- Step 1: Spotters down – Arpeggio bursts.
- Step 2: Explosives on legs/canister.
- Step 3: Gun weak points during reload.
- Step 4: Kite if it closes; roll perpendicular.
But there’s a catch – adds spawn. Clear wasps/hornets first, or you’re swarmed. Common mistake? Greed-kiting too far, pulling a patrol. Stay local, burst fast.
Scoring Big – Loot from Bombardier Wrecks and Core Power
Down it, and the real fun starts: scavenging. Main body, legs, debris – 3-6 Bombardier Cells average, up to more with luck. Stack max 3, hence the augment. Cells sell for 5,000 credits each – vendor runs pay off big. Recycle extras: 2 ARC Alloy + 2 Adv Mech Comp per cell. Smart play.
| Loot | Drop Chance | Use |
|---|---|---|
| Bombardier Cell | Guaranteed (main) | Refiner Level III; Sell 5,000 Credits; Recycle: 2 ARC Alloy + 2 Adv Mech Comp |
| ARC Alloy | High | Crafting basics. |
| ARC Powercell/Adv | High | Ammo, upgrades. |
| Mech Components | Medium | Gunsmith. |
| Heavy Gun Parts/Launcher Ammo | Low | Heavy weapons. |
Cells are the prize – Refiner III unlocks rare refining, mid-game must. I’ve banked 50k credits farming. Loot fast – PvP steals wrecks runs. Photoelectro Cloak close, snatch, ghost.
How to use cores? Refiner menu: Slam cells in, boom – Level III. Better yields on alloys, powercells. Pair with Gunsmith III for Hullcracker spam. Progression hack: Farm 15 cells, hit Refiner III, then loop for endgame mats. Worth every shell dodged.
But wait, there’s more loot nuance. Legs drop Mech Comps 80% time – stockpile for Venator upgrades. Debris? Powercells for infinite Anvil fire. Full clear nets 20k value easily.
Farming Loops for Bombardier Cells Non-Stop
Want endless cells? Routes galore. Buried City Loop: Parking Garage > Hospital > Extract at Piazza. 20-min cycle, 6-9 cells. Blue Gate Blitz: Trapper’s > Checkpoint > Tunnel EXFIL. Low PvP. Spaceport Snipe: Elevator > Maintenance > West Hangar. High ground heaven. Night Raid Special: Dam Primary – doubles spawns, fat XP (500 destroy + 300/scavenge).
Tips to max efficiency:
- Queue low-pop servers – fewer stealers.
- Looting Aug + extra pockets.
- Extract partial – don’t greed.
- Duo for speed clears.
- Scout with a drone before committing.
I hit 30 cells/hour peak. Scales with squad. Advanced loop: Buried City full clear – start Library, hit Town Hall, Garage, Hospital, Park. 45 mins, 15+ cells. Risky, but squads eat it.
Seasonal twist? Winter events amp spawns – stock up now. Compared to Ravager farms, Bombardiers are easier solo and have better ROI.
Common Mistakes That’ll Ruin Your Bombardier Hunts – And How to Fix ‘Em
We’ve all done it. Panicking under fire, forgetting spotters, looting slowly.
- Mistake one: Fighting in the open. Shells arc over low cover – find ceilings or deep ruins. Fix: Pre-scout elevations.
- Mistake two: Ignoring adds. Hornets swarm post-shells – Blaze nades wipe ’em. Fix: Clear the radius first.
- Mistake three: Bad ammo management. Hullcracker eats Launcher Ammo – craft doubles pre-raid. Fix: Refiner II powercell focus.
- Rage-quit fuel: Spotters respawn mid-fight. Loop: Burst, dodge, repeat. Patience wins.
Player story time – my duo wiped a trio stealing our Garage kill. Flanked by Wolfpacks, looted their corpses too. Sweet revenge.
Squad Play: Dominating Bombardier with Friends
Solo’s fun, but squads multiply cells. Roles: Grenadier (Wolfpacks), Sniper (knees), Looter (augments). Comm: “Spotters up, canister rear!” Sync bursts – 30 seconds flat. Four-man? Two flank, two suppress. Dam Night Raid? Pull two Bombardiers, melt both. Share cells evenly – Refiner queues.
Loadout tweaks:
- Grenadier: Double Wolfpacks, light shield.
- Flanker: Snap Hook, medium shield, Anvil.
- Support: Heavy shield, Arpeggio for adds.
- Looter: Max pockets, cloak.
Pro squad tip: Zipline chains for quick repositions. Beats any solo grind.
Weapon Breakdown: What Chews Bombardiers Best
Hullcracker? God-tier. Penetrates dome, AOE legs. 120mm rounds chunk 30% HP. Anvil IV alternative – sustained fire, cheaper. Ferro for noobs: Heavy ammo plentiful, knee-shredder. Venator? Sniper weak points post-explosives.
Grenade tier list:
- Wolfpack: S-tier, direct dome.
- Trigger: A-tier, legs.
- Blaze: B-tier, adds clear.
- Deadline: God for the canister.
Mix ’em – open with Wolves, close with Triggers.
Endgame Bombardier: Breach Events and Variants
Breach events spawn elite Bombardiers – 20% more HP, faster shells. Same strats, but Heavy Shield only. Cells? Blue-tinted, double value for Refiner IV teases.
Variants rare: Armored legs – explosives mandatory. Farm Breaches for ’em.
Progression: 50 cells = full Refiner/Gunsmith. Then? Farm for credits, alts.
Killer Loadouts Tailored for Bombardier Grinds
Budget: Ferro + Trigger Nades. Mid: Hullcracker primary, Venator secondary. Endgame: Double launchers.
- Solo Beast: Hullcracker, Wolfpacks x4, Heavy Shield.
- Duo Flank: One explosives monkey, one sniper.
- Farm King: Looting focus, light load for speed.
- Squad Nuke: All Wolves, coordinated.
Analogy time: Fighting a Bombardier is like tag-teaming a grumpy neighbor’s BBQ grill – dodge the flares, hit the propane tank, grab the ribs. Hilarious when it tips over.
There you have it – Bombardier mastered. Next run, you’ll be the one raining hell. Hit those spawns, stack cells, upgrade hard. What’s your best kill story? You can share the feedback by writing directly to our team at ChiefGames. Happy raiding!